

Monday - Thursday 8am - 5:30pm
Friday 8am - 4:30pm
Saturday - Sunday By Appointment

So you just received the brown box from the FedEx driver, you are excited as hell and anxious to get the coil-overs installed on your vehicle and take it for a spin. While the excitement can get the best of us, like a kid in a candy store, it is still extremely important to make sure the coil-overs are properly set to avoid future headache that may occur when the coil-overs are not properly set up. You just purchased a fully adjustable suspension kit for your ride! Of course you will have to make adjustments to dial it in and get it set up correctly to get the most from your vehicle and your new suspension setup.

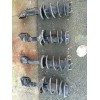
In the above photo, you will see there is a gap between the spring and the two lower locking spring perches. The gap is denoted in green. NOTE: Do not adjust height with the two locking perches-- available shock travel will be decreased and can potentially damage the shock. Setting the ride height with the two locking perches will void the coil-over warranty. You do not want to have a gap between the spring and the upper and/or lower spring perches. Leaving a gap between the spring and the perches will sacrifice usable shock travel and increase the potential for bottoming out the shock against the bumpstop. For example, if there is 1" of gap between the spring and the perch, you are losing 1 inch of valueable shock travel.
There are several ways to set the spring pre-load. A technical and mathematical way of setting the spring pre-load would be to first measure the free-length of the spring when the spring is unloaded. You do not want to measure the length of the spring if the spring is compressed in anyway as it would give you an inaccurate free-length measurement.


This particular spring is approximately 7 1/16" to 7 1/8" in free-length. NOTE: Not all springs share the same dimensions, so please take note on the free-length of each spring included in your coil-over kit. The front pair of springs will be the same length, and the rear pair of springs may be of a different length. Now that you have the spring free-length, you want to adjust the two lower locking spring perches so that the spring is snug within the top and bottom spring perches. The length of the spring should be approximately the same as the free-length.

If you notice now in the above photo, the measurement of the spring is still approximately the same length as the free-length of the spring. The idea behind this is that the spring should not be compressed (e.g. "pre-loaded") by the perches. When installed on the vehicle, the spring should not have any vertical movement-- it should be be able to move up and down along the shock body. Also, to check for the tension of the spring perches against the spring, it should not take too much force to twist the spring in place, but it should not be too loose that it is easy to spin the spring within the perches.
Once you have made sure that there is zero pre-load on the spring, you can proceed to lock the two lower locking spring perches together to hold the spring in place. For the most part, this is rather intuitive, but without fully understanding the concept "righty-tighty, lefty loosey," it can become confusing especially when there are multiple ways of positioning the spanner wrenches against the perches to adjust them. The easiest way to portray how to tighten the spring perches against each other is described in the following photos:


In the above photo, the spanner wrench to the left of the coil-over body is the larger spanner wrench and is affixed to the teeth of the upper/larger spring perch. The spanner wrench to the right of the coil-over body is the smaller spanner wrench, affixed to the teeth of the lower/smaller spring perch. When looking "up" at the two lower locking spring perches and coil-over assembly, you are trying to rotate the larger spring perch "counter-clockwise" and rotate the smaller spring perch in a "clockwise" direction-- again, these references are made when looking "UP" at the coil-over at an angle.
If you do this correctly, the perches will thread onto the shock body and lock against each other. If you positioned the spanner wrenches incorrectly and rotated the perches incorrectly, the locking perches will separate from each other. If the perches separate simply do the opposite of what you did. Yes, it is THAT simple! Congratulations on correctly setting the spring pre-load! Now proceed to set the spring pre-load on all four corners. After pre-load is set, you can set the length of the coil-over assembly to set the ride height.
Once you have set the pre-load and locked the spring perches together, it is time to SET THE RIDE HEIGHT BY ADJUSTING THE SHOCK LENGTH.


|
© 2025 all rights reserved | Speed Culture Shop | Phone: 01803 525750 | E-mail: sales@speedculture.co.uk | |
|


